

I know I'm weird, but classroom reveals are seriously one of my favorite things about this time of year. I just love seeing what everyone's done with their spaces! So, without further ado, here's my 2015-16 classroom tour!
Warning: picture overload coming up.

This is a view of my classroom from the front of the room, where I would typically be. Don't worry - there's another group of desks to the right that I just couldn't get in the frame from this angle. I love my colors this year! I went with Schoolgirl Style's "Hello, Sunshine" collection, and I absolutely adore it. I had black and yellow with bees and daisies before, but it seemed so stark. Plus, as you'll see, the lockers in my room are a pretty teal - but they were difficult to work into the color palette. This collection solved my problems!

So, now we'll start our tour from the doorway. When you walk in, this is what you see from the back of the room.

Here's another view from the doorway looking in.

Turning to the right, I have my cabinet with clip chart and lockers.

This is my "how do the kids get home" board. It's just a painted cookie sheet and everything's got a magnet on the back.

These are on the lockers - I have one for Line Leader, Door Holder 1, and Door Holder 2. I have a kid whose job it is to move these daily so that those assignments are switched each day. They're printed on card stock, laminated with my personal laminator, and then have a magnet hog glued to the back.
I'll just say it. I love my personal laminator. I don' know how I've lived all this time without it.

The Wall of Lockers. I know. I am very lucky to have so much storage!

I also have these cabinets that run the length of my classroom. On each set, I have a literature "theme," and each time we read a book we discuss the theme, write the title on an index card, and put it under the correct theme. By the end of the year, we have a nice view of our read alouds!
The boxes above are just paper boxes that I'm using to organize my math manipulatives by EngageNY module. For those of you using third grade EngageNY, you are correct - there are only 7 modules. And you see 8 boxes. The problem is, 7 is an odd number. Which means I was faced with a really tough decision: Do I have 4 boxes on the left and 3 on the right? Or 3 on the left and 4 on the right? I'm telling you, THESE are the things that keep me up at night. While I was debating, a friend came in and said, "Just make a box 8." And I said, "Well, what would I put in box 8? There's no module 8." And she said, "You don't have to put anything in it if you don't want to. Or you can use it to store extra stuff."
She's a genius.

Same concept, just on the other end of the room.

And in the middle is this sweet pennant that was part of the Schoolgirl Style collection!

The different stools at the computer center are bugging me. :) But this is my technology center. Our fire marshal doesn't let us hang lanterns from the ceiling, so this is my workaround.

Quotes from my favorite children's books are framed and on the wall.

This is a coffee table that a friend of mine snagged for me from Goodwill for $5. A coat of black paint, and it's the perfect place for my printer and paper.
Library pictures:


Harold the Hamster lives in our library.


My library wraps around half of my room, and I have this window in the middle. My old crate seats latch together and make the perfect size bench for this spot. I absolutely love the tassels on the curtain - they're tissue paper tassels from Schoolgirl Style's shop.

I got this from Hobby Lobby. Matches perfectly, and I love the quotes!

I don't do a lot with bulletin boards - I'll use them to display anchor charts we'll make as a class.

Do you have a strip of cork running at the top of your whiteboard? You can staple on a length of ribbon to cuten it up!
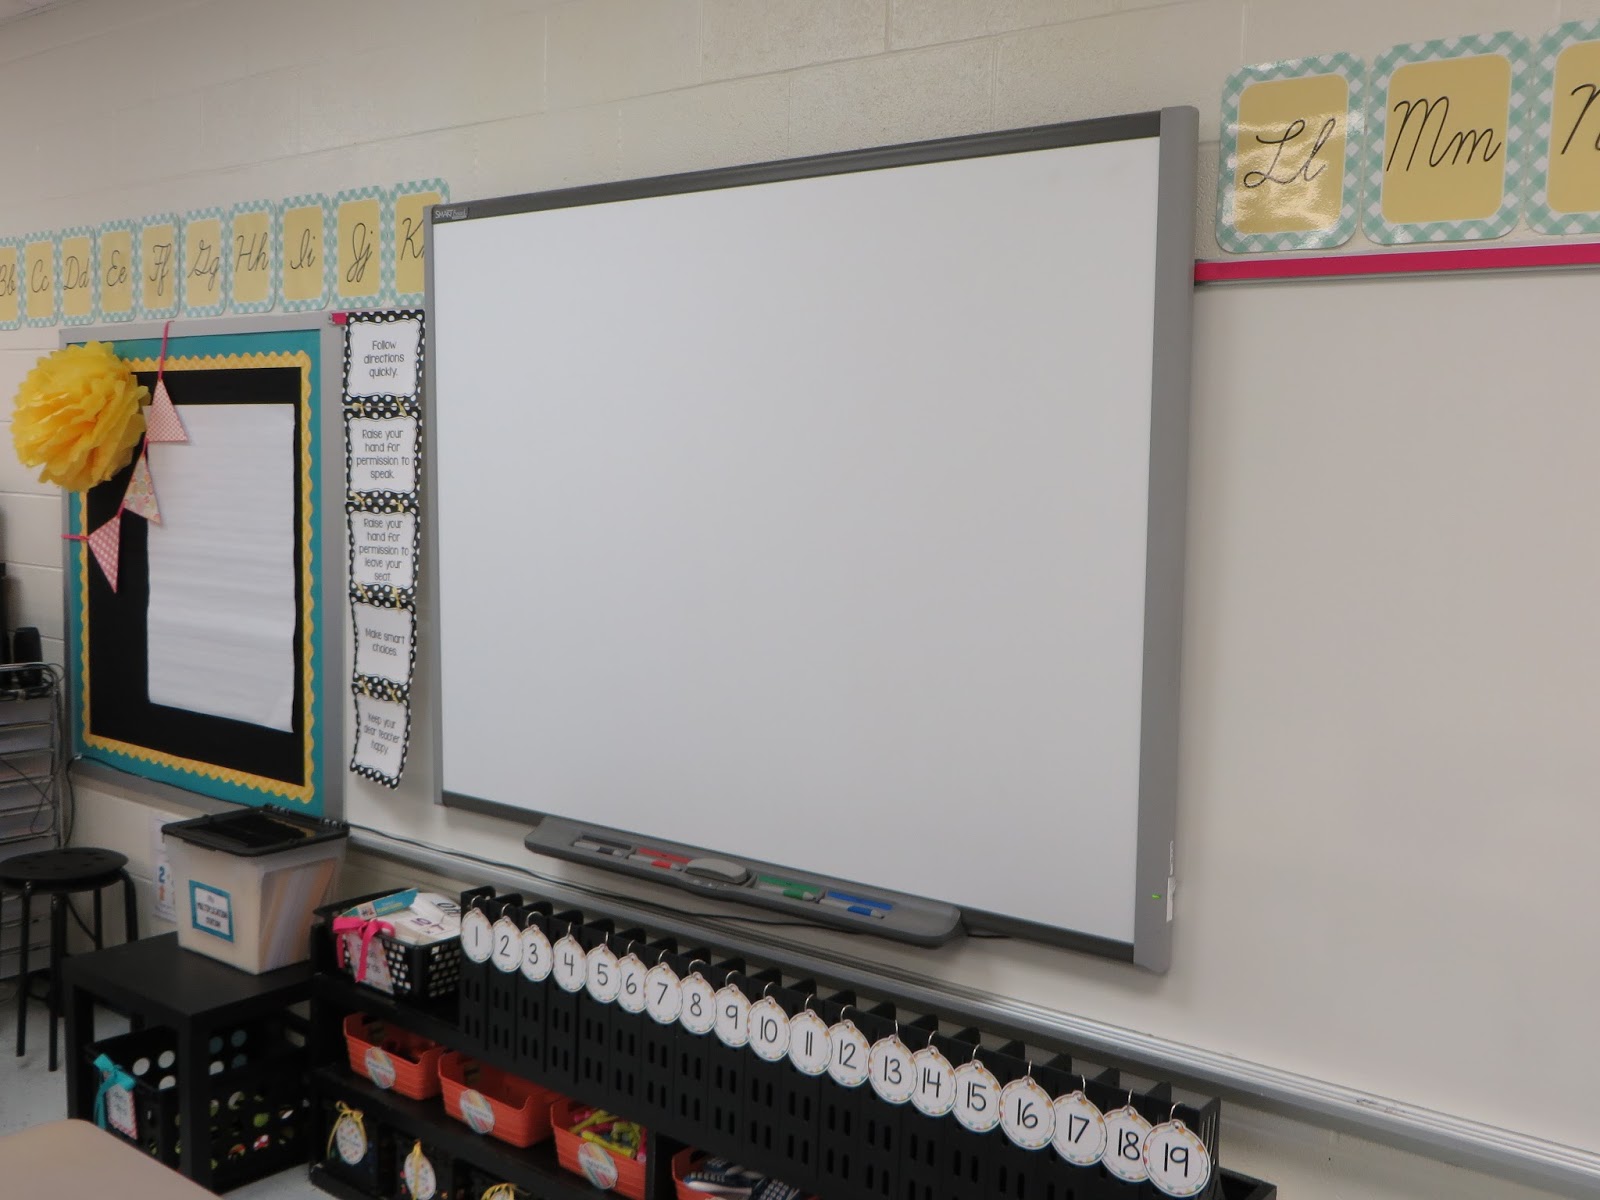
SMARTBoard with WBT rules to the left. I have a low shelf underneath for storage.

On it, I keep the kids' book boxes, extra school supplies, manipulatives, and fluency kits.


I have another bulletin board to the left of the SMARTBoard. Side note: I REALLY wish they'd centered the SMARTBoard.
You've probably noticed that I still have a lot of black and white polka dot stuff left over from my previous theme, but I thought it went well with this one, so I kept some of it.
You've probably also noticed I have a slight "thing" for lamps. I bought every one of them - except for the branched one in the library corner - at some kind of thrift shop, Goodwill, or Wally World place. I just snagged a deal and then recovered the lampshades with discount material and trim I got at JoAnn's. It is seriously easy to recover a lampshade! If I can do it, you can absolutely do it.

Multiplication Station lives here along with safety patrol supplies.

I inherited this table my first year, and I painted the edges and Mod Podged scrapbook paper to the top. It's just one spot the kids and I can sit and talk really quickly about their work.

This is where it all happens! I got rid of my teacher desk years ago, and I use this instead (and I'd never go back, by the way.)

I use this bookcase and rolling cart to keep all of my supplies at my fingertips.

You've got to have pictures of your own kiddos, right? Sweet babies.

I got the top quote from Hobby Lobby. At the end of the year last year, one of my parents gifted me with the second one. She painted it herself and wrote me the sweetest note on the back.
I cried.

Now we've made our way around the room - this is the last wall. I made the posters on the top, to go with the major reading comprehension strategies. I love the way that the border, ribbon, and lantern lights really brighten this up.

Here is my plan for turning in papers this year. Each kid has a number magnet on each board. So, if I want them to turn in a math sheet, I'll say, "Turn it in to the pink tray." They'll turn it in to the tray with the pink ribbon, then move their pink number from the "1" board to the side on the whiteboard. That way I can see at a glance who hasn't finished, and I can write a note above the smaller boards of what work they owe me. Same with the green tray and numbers, so I can manage two sets of papers at one time. I usually have a kid whose job it is to put the papers in number order for me, so when they're both filled up we can quickly empty one, put the numbers back, and go.
It sounds confusing. I'll let you know how it works!

Schedule, hand signs, and calendar.

A friend was getting rid of this swivel thing and I snagged it. It has these three holders, perfect for Plickers and other miscellaneous stuff.

This is where kids will store their guided reading books, data binders, and group supplies.

This table holds my SRA kit, hand sanitizer, pencil supply, and sharpener. The carts underneath hold paper and center supplies.


If you have one of these size organizers, really wide grosgrain ribbon fits perfectly inside each drawer.

I think this flower pattern may be my favorite one from the collection.

I need new cubbies (see the collapsing one?), but I really don't want to spend $75 on a new one, so this will have to make it another year. I keep a basket with baby wipes and other little supplies in it on top. Tip: A bit of wide bulletin board border will perfectly hide the label on a baby wipe box! The little labels on the side are cute "goodbye" sayings.

Just a reminder as they head out the door.

This is just outside my door.

Hall work display. I have the kids write a letter to future third graders during the last week of school, and I put them back out when the new year begins. It's cute to see what advice they have to offer!

I saw this curtain idea somewhere. It's just a couple of Command hooks and a painted dowel. I "made" the curtain just using iron on hem tape. Then, I roll it up and tie ribbon to keep it there. It is super easy to untie the ribbons and let the curtain fall in case of a lockdown.

The birthday basket. In years past, I have made cute little birthday treats. This year, I did a good clean out of my cabinet before school was out and found a TON of erasers, stickers, bookmarks, pencils - even some mini Play-Doh! I got some treat bags, filled them up, and tied a ribbon on top. I'm betting they like these just as much.
And that, folks, is it! Thanks for sticking with me through about 50 pictures. I love my home away from home, and I can't wait to see what everyone else has done with their spaces! So much fun!
Cathy,
ReplyDeleteYour room is beautiful! If you are weird for loving Classroom reveals, then so am I. :) I just love looking at other peoples spaces and learning from them. I am working on my class reveal post and it will be my most favorite as I have made some significant changes. Can't wait.
Thanks again for sharing your lovely space!
Thank you! I can't wait to see yours!!! Eeeeeek!
DeleteYour classroom is so nice! I loved all of the pictures. It is really inspiring to see others ideas. Thanks for sharing!
ReplyDeleteThank you!! I love my little home away from home. :)
DeleteGreat job as always!!!! I LOVE classroom reveals as well!
ReplyDeleteBlessings,
Becky
CookingUpSuccess
Thanks, friend!! :)
DeleteI love how you combined the old touches of your decor with the existing lockers with the new color scheme-- looks perfect but not too "matchy". I also love your box 8. If you are bothered by the mismatched stools, put the black one in the middle. I think it would add a little more symmetry (of course it may also drive you crazy because the kids/custodian may move them over the year).
ReplyDeleteMy Bright Blue House
Thanks! Yes, I like that everything "goes" rather than "matches." I did the "matchy" route last time, and it totally stressed me out worrying about whether I was buying the "right" shade of yellow. Ha!! Thanks for the tip about the stools - I'll try that today!
DeleteYour classroom looks great! I love the colors and so very organized. You are inspiring me to do a lot more than I had planned. That is never a bad thing :) Have a great school year!
ReplyDeleteJessica
Thank you!!! Enjoy decorating! :)
DeleteLooks amazing!
ReplyDeleteThanks, Elie!!
DeleteI just found your blog and I love it! You're classroom looks fantastic! You've given me the inspiration to finish organizing and decorating my classroom. Thanks for sharing your ideas!!
ReplyDeleteThanks!!! Very glad you found me. :)
DeleteI found your blog through Five for Friday. I love your classroom! I am sure your students find it very inviting and cozy. Have a good school year!
ReplyDeleteSo glad you found me!! And thank you. :) Hope you have a fantastic year, too!
ReplyDeleteLove your room! You have such great ideas, especially the birthday basket! I am SO going to clean out my treat box and do the same thing. Thank you!
ReplyDeleteThank you!!! It's amazing what I found when I really started cleaning out. ;)
ReplyDelete
ReplyDeleteNice writing . I Appreciate the information ! Does anyone know if I could get a blank 2008 IRS 1065 - Schedule K-1 form to edit ?
Hello Jerick! I found a blank fillable Schedule K form here:http://goo.gl/Ms4ebj. You might want to check this out.
DeleteHi! I just stumbled across your blog, and I'm hooked! I teach third grade too (actually in your area), and I LOVE your ideas! I could look at teaching blogs all day long; it's like Pinterest -- I look up and five hours have flown by! LOL :) Well, I have two questions for you: Are you able to decorate the outside of your classroom door or does it have to stay uncovered for the fire marshall? (We are currently debating about our own classroom doors for this fall.) And Question 2, how did you make those amazing reading comprehension posters? I love making anchor charts, but sometimes there are graphics I'd really like to add. Thanks so much for your post!
ReplyDeletewow, it's amazing! thanks for taking photos! i think your hed is full of new ideas! http://edit-it.org/blog/tips-for-future-teachers-how-to-teach-future-perfect will be handy for everybody and for future teacher in particular!
ReplyDeleteI know this is an older post but... I was wondering what you use to get everything to stick to your cinderblock walls. The only think I've found that works is double sided foam tape but when removing it it either tears the posters etc or peels all the paint off of the walls! HELP :)
ReplyDeleteHot glue! It will last a good year or two, and then it's an easy thing to peel off the old glue and just reapply. It has to be the truly hot glue (not the cool temperature stuff. At the end/beginning of each year, I just plug it in and go around the room gluing down loose edges, reattaching stuff that's fallen, or checking for wiggly decor that needs a little extra. Hot glue WON'T peel paint off the walls but it WILL tear up things if they're not well laminated - and even then sometimes it will tear those up. I love to hot glue clothespins to the wall and hang stuff up that way. Makes it gentle on the paper and easy to move around. Hope that helps!
ReplyDelete